

I've been working away at organizing my basement, which houses my studio. It's been a big mess for years. I'm a collector and I've dealt in collectibles in the past. When I closed my space in an antique mall about a century ago, I brought home a lot of stuff. I kept adding to it and my health was poor at the time and I just lost the will to organize. I'm happy to say that I'm now well on the way to a workable space that is much more pleasant. I got inspired last week to empty a bookcase in our TV room because it was just too crowded. I knew that the bookcase would be a good place to display my beautiful jars full of doo-dads. Since it was a run-of-the-mill Dania-issue 90's black bookcase, I thought I might be able to make it a little more "me". At first I thought I might take off the cardboard backing to the shelves and put in chicken wire. My partner, Herb, assured me that the backing, even though it was cardboard, was indeed lending structural integrity to the piece. I knew this shelf would be holding a lot of weight, so I went to Plan B. I have a lovely giant roll of brown kraft paper which I thought would look nice with a smudgy coat of white paint. I used a semi-gloss cream colored interior latex on the pieces of paper I measured to fit into the spaces above and below the permanent middle shelf. Even before that paint layer, which left some of the brown paper showing, was dry, I began painting on big brown swirls using craft paint. Nice! I knew I wanted another color, and I knew I wanted this to be a bold, graphic design, so the next swirls I added were black. I so loved what I'd done that I stood and admired my work for quite some time. I could have stopped there, but gold is just too tempting. I accented just a few swirls in each section and it was just the touch I was looking for. Up went the pieces, using carpet tape to adhere. In went the shelves and m-m-m-m. I love it. It was full in just a few moments and it's very pretty to look at. I have another shelf exactly like this one in my studio and it's stuffed with books and ephemera. I think it's going to be transformed next.
Tuesday, August 28, 2007
STUDIO BOOKCASE REVAMP
Posted by
JUDY CORONA
at
7:34 PM
0
comments
![]()
Sunday, August 5, 2007
LEARNING TO SOLDER


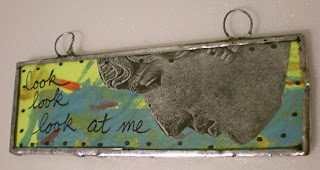
How long have I wanted to actually know how to solder??????? Don't ask. How long have I had a soldering iron, flux and solder????? Oh, please. Way too long. I have tried several times to learn how to "run a bead", to "tack" and just to make the solder look unhorrible enough to not completely distract from the project. I'm getting there. I loved that so many people on blogs, in books, on craft shows, etc. would say, "Just keep trying. You'll get better. It takes practice." And while I haven't arrived at the nirvana of the gorgeous, thick, shiny, even solder I admire so much, I am certainly better than I was. Things I learned along the way:
-the soldering iron seems to have a "sweet spot" where the solder will melt and adhere to the iron so that you can turn your iron in the direction it needs to go
-many of the dark spots and sooty things that beginners experience can be polished off with nothing more than a towel
-Sally Jean Alexander is a genius. You really can solder on lace, on paper, on wood. The "Dream" piece is done on a piece of painted tongue depressor.
I was so eager to try soldering slides again that my collage is nothing more than pure "what was laying in front of me on the table". I was also too impatient to look for one of the one million jump rings I own, so I made my own out of wire since I was just practicing anyway. I was doing all this after I hurt my back while hauling something to Goodwill, so I really was using what was at hand. I've got a long ways to go but I'm getting there. Hooray!
Posted by
JUDY CORONA
at
6:04 PM
0
comments
![]()

